Who besides me hates the blue pop up menu boxes? I hate the way they work, the scripting overhead they create, I hate the color and I even hate where they appear on the screen.
Seriously you guys, I hate them so much!
I mention this because one of the trickiest things I’ve run into using RLV is force sitting someone. Sure it’s easy when the number of things to sit them on is limited or they all have clear and descriptive names, but how often does that happen? Instead you get a menu pop up with page after page of things like ~ball1 or object.
See? What’s not to hate, right? But what if some clever bunny came up with a way that you could select things quickly, easily, and intuitively?
Well call me Bugs and feed me a carrot cause that’s exactly what this HUD does. Well that and a few other things. It’s probably easier if I run your though the steps real fast.
Getting started
Easy as can be. Wear the HUD and wait for it to tell you that it’s ready.

Normally this takes just a few seconds. You’ll get a status report and the little red face here will show up indicating the HUD is in standby mode, aka “I ain’t doin’ nuthin'”. Click ole “red face” to activate the HUD:

You can toggle the HUD in and out of standby mode with the large eyeball button. Since standby mode suspends the script operations it helps to reduce sim resource utilization a little bit when it’s not needed.
Select A Target Magic Time
“So, if the HUD doesn’t use any blue pop up boxes, then how do I pick things with it” you’re asking yourself in the way I tend to imagine people talk to themselves as I’m writing instructions 🙂
I wasn’t kidding when I said “what if you could select things just by looking at them”. The HUD tracks the exact position of your camera and can detect avatars and objects that are centered on your viewer screen.
Or in practical terms, if you hold down the ALT key on your keyboard and left click on someone or something the HUD will “see” it and you can – maybe – do stuff to / with it.
Cool, right?
So the first step is to pick out your potential victim by centering them on your screen. You can use ALT and left mouse click, or – if your viewer supports it, select the name of the avatar from the nearby people popup then right click and select “Zoom In” from the menu.
![]()
When an avatar is centered on your screen their name will appear on the upper half of the HUD. The names are color coded to indicate whether or not that avatar is using RLV and has an active relay. If the name appears in red like this:

That means the HUD can’t contact their relay and so it can’t do anything with / to them, but if the name appears in green:

That means that it found an active relay. Notice the little box to the far right? Clicking it will “lock” the HUD onto that avatar. The avatar’s name will turn blue to indicate that they’ve been selected:

Once an avatar is locked you can do stuff to them! You can also move the camera away from that avatar but their name will stay on the HUD. If you’ve changed your mind click the tick box again to disengage the lock.
The Buttons
There are several buttons that will appear and disappear depending on what you’re doing once you’ve got a target locked. For example as soon as you clicked the Lock button two additional buttons should have turned up beneath it.
Status Report |
Because I’m me and seem to be incapable of starting at the beginning, lets start with the one to the far right which is also the hardest to explain – the little clipboard which in the world of Mina means “Status Report”. Clicking it will give you a wall of text about that person starting with their current RLV restrictions and exceptions:
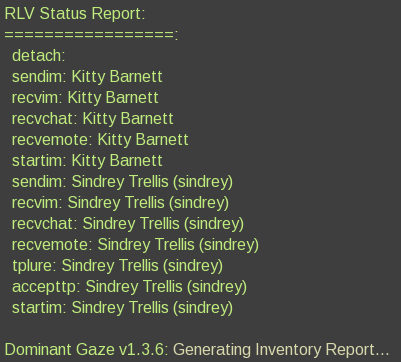
As an added bonus, clicking any of the names which appear next to a restriction / exception will open that person’s profile.
But that’s not all. See where it says Generating Inventory Report? That means that more slick stuff is on its way. Err in about five to 10 seconds since there’s lots of data collecting and collating going on. Eventually you’ll get something like this:
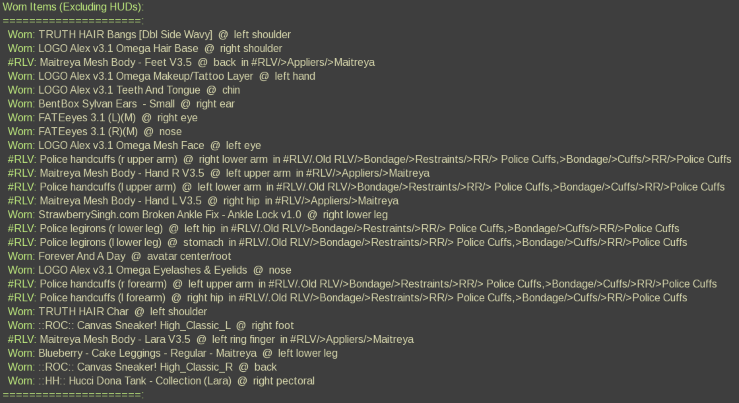
Sorry, I had to shrink it down some cause I was NOT kidding about the wall of text 🙂
The Worn Items report displays worn items but there is a “gotcha”. When they implemented the new scripting tools that allow this to work, Linden Labs chose to only provide information on worn attachments – so no checking out someone’s boob physics – and then only on things attached directly on the avatar, but not HUDs. This is a privacy compromise that they made reasoning that if something is worn in world you could simply right click on it and inspect it to see what it is, but you can’t right click on someone else’s HUD or skin.
The report itself tries to shoehorn as much information as possible into your beleaguered chat window so let’s take a look at a smaller bit of it:
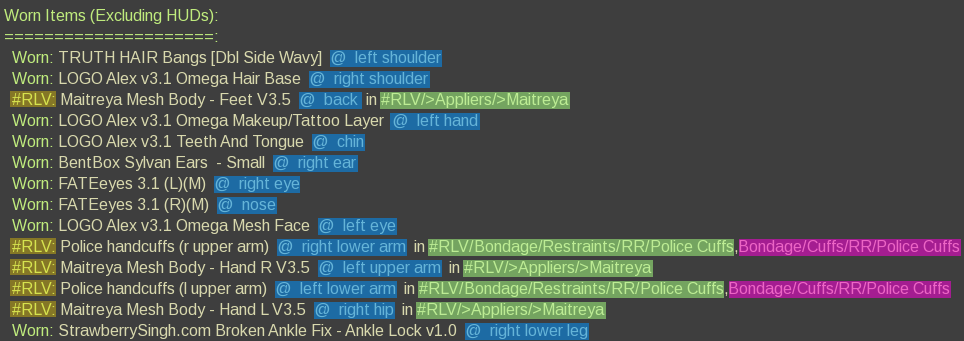
Sorry, it looks like I just got my first set of Hi-Lite pens isn’t it 🙂
First off, notice that each line item starts out with either Worn or #RLV. A line prefixed with #RLV – which I’ve highlighted with yellow in the above screen capture – indicates that the item was found at least once in the avatar’s #RLV folder. Worn simply means that it’s worn but the HUD couldn’t find it in #RLV.
The next thing that’s kind of spiffy is the worn location, which is highlighted with blue. This way you can tell that I’m wearing my double side wavy bangs on… On my left shoulder? Man, SL is just weird. Remember the Dominant Gaze can’t report on things worn on the target avatar’s HUD, and of course it can’t tell you about things like skin or shapes, only attachments worn directly on the avatar.
Time for more cool RLV stuff, this time in green AND sometimes pink! Any attachment that the HUD locates in the target avatar’s #RLV folder will also display the sub folder(s) for that item. Notice that my Maitreya feet are in my #RLV/Appliers/Maitreya folder? Well actually they’re not really, but an inventory shortcut for them is and to the HUD that’s the same thing.
If you look a little farther down at the Police Handcuffs you’ll notice that they show up in two folders. That’s because – hyper obsessive organizer that I am, I’ve got inventory shortcuts for them in two locations. The HUD will try to report all the locations it can find separated by commas, but there are limitations in the way RLV viewers communicate with scripted objects, so some folders may get left off or truncated.
Gaglator |
Wow, that last one got long huh? Luckily this one – despite having a typically bad Mina name – is pretty simple to explain even though it borders on being outright sorcery. That’s right, just a hair’s breadth from full on dark arts happening right here people!
So what does it do? Oh nothing much, only simultaneously translates “gag-speak” back into clear text. Y’know, no big deal or anything.
When it’s turned on the “gaglator” will convert the “gehf mmffdress” of your target back into “yes Mistress” and pass it to you in a discrete IM. No more guessing what your captive gag mumbled!
See! Dark arts all up in this bitch, AND also the explanation was still way less wordy 🙂
The Other Buttons
There are two more buttons, but they only light up when you point your camera at an object or the ground like so:

It turns out that you can select target objects the exact same way you select target avatars. Cool huh?
In this case I’ve aimed my camera at a handy chair by holding down the ALT key on my computer keyboard then left clicking on the chair with my mouse. The name of the object will appear below the targeted avatar – well the first 24 letters of the name at least – and now I’ve got the following buttons:
Force Sit |
Assuming that the target avatar isn’t already sitting, you can use the Force Sit button to… Well, force them to sit on the object you’re looking at. Just click the icon and as long as they’re able to sit on that object their butt will go down on the double.
Once they’re seated, or if they were sitting to start out, you’ll notice that the button looks a little different. Clicking it will stand them back up again.
Like I said at the beginning, no more trying to figure out just which object or ball~1 to pick, just look at it and click the sit button.
Yes, I AM amazing, thank you for noticing 🙂
Teleport |
Finally we come to the last function which ironically is about the simplest function on the HUD. Just click this button to force teleport the selected avatar to that spot. Err as long as that spot is in the same region 🙂
Also the HUD can’t overcome SL teleport restrictions such as ban lines or teleport landing zones. If it could it would cost a lot more 🙂
Caveats
- The HUD won’t try to overcome pre-existing RLV restrictions, so if the avatar isn’t allowed to sit the HUD won’t do anything, in fact the Sit button won’t even appear. On a related note, odd as it may sound, the teleport function is actually a sit. Weird huh? The upshot is that even if an avatar is allowed to TP, if they have RLV blocks on @sit or @sittp they won’t be teleportable.
- Avatars can only be seated on objects. The HUD can’t force a ground sit.
- Sit and teleport objects / locations must be in the same sim.
- Mesh and phantom objects can be hard for the HUD to detect. If the name of an object isn’t appearing on the lower line try re-positioning the camera slightly until the object’s name appears on the HUD.