The My Eye View HUD (MEV to save keystrokes) is a HUD based tool to allow you to easily control your SL camera by changing its position relative to your avatar, the camera pitch, and by adding several special functions. The following will – hopefully – explain all the ins and outs of the MEV.
A couple of quick words of thanks to Warp Bubble and Alien Wise for their invaluable – and superhumanly patient – help trying to beat rotational math into my thick skull, and also to Liana Halostar whose help testing the HUD was amazing.
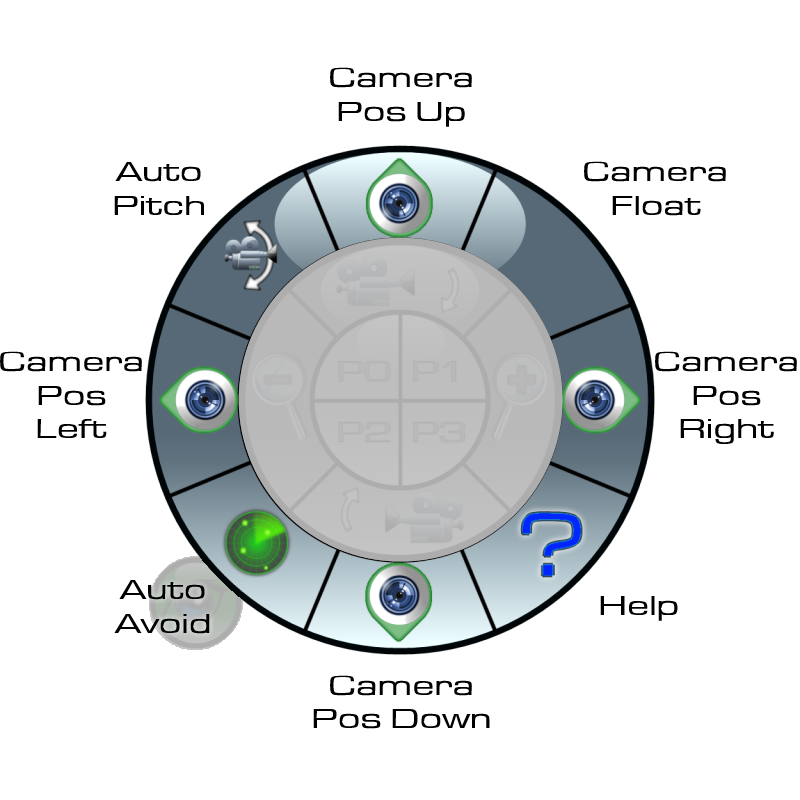
The MEV only works when attached to your HUD. It will complain bitterly if you rez it on the ground or attach it to your avatar directly. When it’s attached to your HUD it should look something like this:
 Let’s start out with the most obvious choice, the power button which is the green button with the pretty blue eye staring out at you.
I call it the power button but it’s actually more of an “on, off and hide the big HUD so I can see things” button, but that doesn’t exactly roll off the tongue, does it? A short click on the power button will hide the HUD so you only have the button itself on your screen. Click it again and the entire HUD will appear.
To turn the MEV system off entirely click and hold the button for three seconds. The HUD will vanish except for the power button which will now be red. To turn the MEV system back on click the power button – just a regular click and release will do, and it will reactivate and change the button back to green.
Now on to the fancy parts. The control buttons are broken into three rings – outer, middle, and inner – so we can tackle them in smaller groups, each with their own hopefully less confusing picture. I’ve obscured everything except the ring that we’re looking at to – hopefully – simplify things a bit.
 The outer ring has eight buttons. Four which allow you to move the camera position, plus the Auto-Pitch, Camera Float, Auto Avoid and Help buttons.
Move Camera Position – These buttons – not surprisingly, will move the camera position relative to your avatar. Click and hold a button and the camera will move in that direction until you release the button, or it is 3 meters from your avatar.
Auto-Pitch – The Auto-Pitch function detects when you’re walking or running up or down an incline, and tilts the camera in the appropriate direction so you can see where you’re going. A small indicator will appear on the HUD to let you know whether it’s on or off.
Camera Float – The camera float level is a little tough to explain. That won’t stop me from trying but in the long run it’s easier if you just set it to say 3 and start walking around. The Float function lets the camera move just a tiny bit slower then your avatar moves. A float level of 0 means that when you start to turn your camera reacts instantly, so when you turn the camera moves to keep you centered in the screen without any delay. A float level of 7 means that nearly a full second will pass before the camera catches up with you.
Like I said, just try it out and you’ll see what I mean 🙂
Auto Avoid – When active, Auto Avoid will keep an eye out behind you and if it detects something between your avatar and the camera position it will automatically move the camera to a position just a little behind you and slightly to your left. As soon as the obstruction is gone the camera reverts to its proper position.
Help – let’s you come straight to this web page – no book marking required. If you press and hold the Help button for three seconds the HUD will generate a report of the current settings as well as all of the presets.
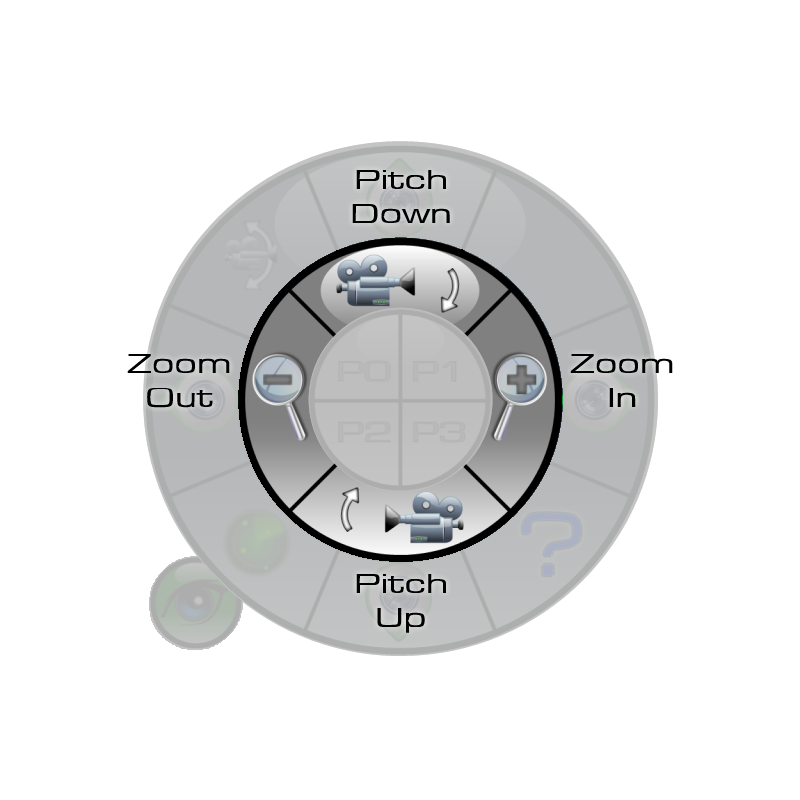
Next is the middle ring:
 Only four buttons and they’re actually paired so really it’s like there’s only two 🙂
Pitch Up and Pitch Down – Click and hold either of these to tilt the camera up or down. Pitching down causes your point of view to raise above your avatar while the camera tilts downward. Pitching up cause your point of view to lower while the camera tilts upwards.
Zoom In and Zoom Out – Clicking and holding either of these will move the camera closer or farther to/from your avatar.
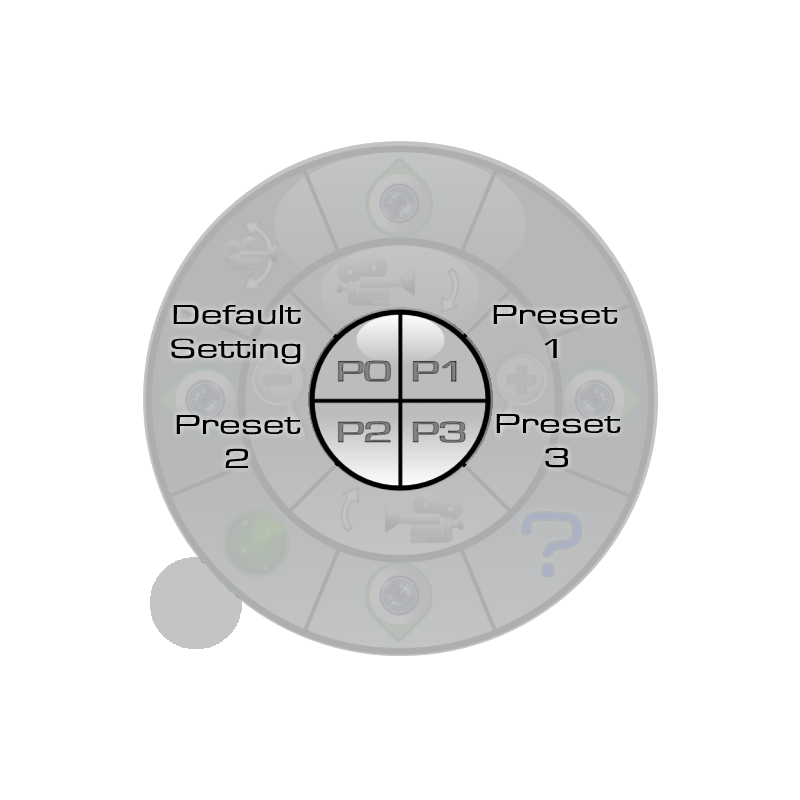
And last comes the inner ring which isn’t a ring at all but just some round buttons masquerading as a ring:
Default Setting – While playing around with all the other buttons it’s not entirely outside the realm of possibility that you’ll wind up with your camera pointing God knows where – I think I was actually inside my own mouth at one point. Clicking the P0 button resets the MEV to its default camera position.
Preset 1, 2, and 3 – These three buttons allow you to store the current camera settings so you can quickly and easily revert back to them. To save a camera setting simply click and hold the P1, P2, or P3 button for three seconds. The HUD will save the information – overwriting the previously saved setting for that button.
To use a saved preset simply click the button normally.
The MEV uses one script and should – SHOULD – work anywhere in SL including no-script areas – though I have noticed that something in no-script areas makes it respond more slowly to button clicks.
If you have any questions or encounter any problems please don’t hesitate to drop me an IM. If you can’t get through to me for some – ahem – RLV-y reason you can also IM my more business minded alt DiabolicalSuperScience.
You can still pick up the free MEV version 2 either from my Marketplace shop, or in my main shop in Second Life.

